Simple Steps To Attaching Clasps
To Bracelets and Necklaces
Attaching clasps to your bracelets and necklaces is relatively easy if you know how.
When you mastered this technique, you will be able to make all kinds of bracelets and necklaces since you will need to attach clasps for most of your jewelry projects.
The only exception are long necklaces (one example is the Endless Garnet Necklace which you can check out on the right column of this page) you can just slip over your head or for bracelets that use elastic strings.
For both; elastic bracelets and long necklaces, attaching clasps are not needed. All you need is to tie a knot.
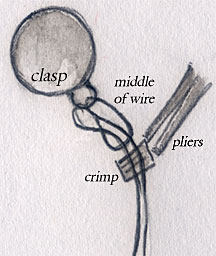
The drawing on the left uses a round clasp as an example.
There are many different kind of clasps in the market. Some simple and some rather decorative. But all will have a loop for you to insert your wire into.
Tips: Always check your clasps before starting your project. Fasten the clasp and its end together first to make sure that both parts work properly. You do not want to finish a bracelet or necklace and after attaching clasps, found that the clasps do not lock properly. Imagine the frustration of having to take off all the beads from the wire, and start all over right from the beginning.
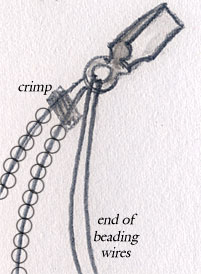
Notes: The above picture shows two strands of beads, each strand on one wire. For some project where heavier gemstones are used, I like to use double wire for a strand of beads or gem stones.
Make sure that the crimp sit nicely on the wire. Leave a tiny space between the clasp and the crimp.
Using the flat-nosed pliers, press hard on the crimp on one side and then again on the other side.
To finish the bracelet or necklace, insert a crimp after the last bead.
Insert the bead wire into the loop of the clasp bit and back into the crimp.
Pull tight and check that the bracelet or necklace is the right length. If not, undo the crimp and add or take away more beads.
When the length is right, use your flat-nosed pliers to crimp tight.
To finish off, insert the rest of the wire neatly into the last few beads.
Trim off excess wire if necessary.
Home › How To Make... › Attach Clasps
Jewelry Inspirations
Sign up now! I'll send Jewelry Inspirations straight to your inbox. It's FREE!
Recent Articles
-
Jewelry Making Instructions' Privacy Policy
May 29, 18 10:43 AM
Privacy Policy of Jewelry Making Instructions. Please read before browsing this jewellery making website. -
Rings That Are Uniquely Yours
May 30, 15 03:46 AM
Wear rings that are uniquely you. Instructions provided here for making ring jewelry. -
Pink Swarovski Crystal Earrings! Need Them Fast?
May 30, 15 02:07 AM
Make this pair of sweet pink Swarovski crystal earrings in 30 minutes and wear it for a date or just shopping in the mall.
If any piece of DIY jewelry here on this website has inspired you to make something beautiful for yourself or a friend, please share it with someone today.
Use the social buttons below to share with your friends or fans.


New! Comments
Have your say about what you just read! Leave me a comment in the box below.